Showing posts with label Bake Console. Show all posts

Tuesday, July 21, 2020

How to create Model in CakePHP 4?

Model is an important component of MVC design pattern, models are basically responsible for storing data and exchange with other layers in the application, in CakePHP models are fat layer and serve as business and data access layer. In addition to these roles’ models can manipulate the data by several other means, for example, files, web services etc. 

Guys, if you don’t know what is MVC design pattern, visit my article What is the Design Pattern of CakePHP 4

Creating Model 

Let’s begin, open the visual studio code, if you have not installed visual studio code, use the command prompt to create the model in your application. It is good idea if you are serious with development then download any good code editor having PHP IntelliSense support. I recommend visual studio code, it is free community edition, rest is up to your convenience. 

On the command prompt, navigate to your application folder and then in bin folder, in my case it is “c:\xampp\htdocs\myshop\bin”. Type the below command for customers table and see the magic. 


The command has invoked the bake utility and created two important classes in their respective folders. The first model class is created under model\table with name CustomersTable and the other class under the model\entity folder with name Customer, both classes are model classes but different responsibilities. The other two classes are generated as part of testing framework and are not part of the discussion in this article. 

Let’s see what is inside each class and how it works. 

Model CustomersTable Class 

CustomersTable class is extended from Table parent class, it inherits several useful features as part of standard package of ORM framework. Table class encapsulate the basic functionality of CURD operation and maintaining the association between multiple tables. 


At the run time when controller requires the model for data insert, update, delete or retrieval, model knows how to handle the request and issue the query to underlying database. All this is handled through Table class provided by the ORM framework. 

The first method in this class is Initialization, here ORM is initialized by setting the table name in the database “Customers”, its primary key name and its display name. These are the minimum configurations required to deal with the corresponding table in the database. 


The second method is ValidationDefault, this method is responsible for the basic validation of the data fields received for insert or update. 


Model Customer Class 

The Customer class extends the Entity parent class, it stores the single row of the table for data manipulation. In this class we can adjust the accessibility of each field. This class is nothing more than just setting the model fields. 


Today we have seen how to create the Model, which is responsible to manipulate data between business and data access layer, model is responsible for data validation. In next article we will see how different views work with models and controllers to visually present the data on customer browser. 

Like and share my article, subscribe for latest articles in future.

Monday, July 20, 2020

How to create controller in CakePHP 4?

Hi guys, in our last article we have seen how to setup database in MySQL. It is the first step to start application in CakePHP, or Database First approach. If you have not seen the article visit the link How to setup Database for CakePHP 4.x Application? Today, we will see, how to create our first controller in application. 

Before starting the coding, I will recommend to download any code editor which support the PHP development, my recommendations is to download Visual Studio Code, it is free community edition and has good support for plugins. After download install the PHP IntelliSense Extension. 

Once you are ready, open the command prompt and create new application, in my case, I have created new application “MyShop” in htdocs folder. If you don’t know how to create CakePHP 4.x application visit the link How to create your First CakePHP 4.0 Application

After creating the application, navigate in to root folder of your application and open the Visual Studio Code. Open the terminal window and move into the bin folder of your application. At the command prompt in the terminal window, type the command as shown below. 


In the command we have invoked the cake bake utility to bake our customer controller, where customers is the table name in my database. Once the command has completed its task you will see that it has created two files first under src\controller\ folder, which is “CustomersController” and the other under test\testcase\controlle\ folder is “CustomersControllerTest”, the first one is your main controller class, and second one is its test case class. We will not discuss the test case class here and leave the topic for other article. 

What is created inside the controller class? 

Let’s open the CustomersController Class in code editor. You will notice that this file contains the CutomersController class which extends the AppController class. AppController is the parent class and all the entity controllers inherits from this class. 

Under this class you will see five methods are automatically created to handle the CURD (Create, Update, Retrieve and Delete) operations. Index and View methods both performs the data retrieval operation but the first one dose pagination of all the available data in the table automatically, View method retrieves one record from the table at a time based on the primary key of table. Other three methods add, edit and delete obvious from their name are used for insert, update and delete. 

At this stage we have fully functional controller to handle CURD operation request. 

Now examine each method one by one. 

Index Method 

In index method on line #20 paginate controller retrieves the customer databased on default pagination settings, pagination settings can be changed by altering the paginate controller properties. After that on line #22 customer data is converted in to array and passed to the corresponding view associated with this view method. In later articles we will examine the views of each methods in this controller. This is the simple job of this method retrieve data from model and pass to view. 


View Method 

In this method on line #34 controller retrieves the single record based on the incoming primary key information and on line #38 it is converted to array and again set to its corresponding view. 


Add Method 
Add method is little interesting, considering the security mechanism this method checks that the incoming data is sent through the POST method of HTTP protocol or not, if it is valid data through POST method of HTTP protocol, then it tries to save the data on line #51, if all is well data will be saved and user will be redirected to index page otherwise operation failed message will be sent back to user. 


EDIT Method 

Edit method works in the similar way as Add method but it accepts the data through PATCH, POST, and PUT methods of HTTP protocol. It tries to save the data on line #75 if successful it redirects the user to index page with success message, otherwise sends the operation fail indication to user. 


Delete Method 

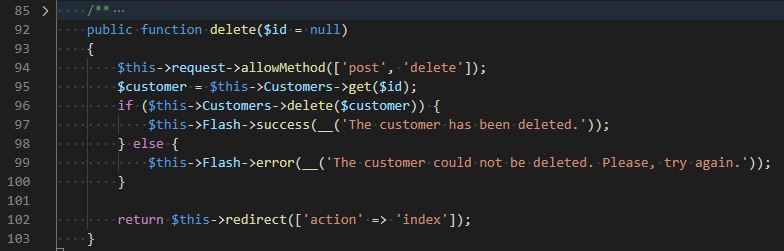
Delete method accepts the data via POST or DELETE methods of HTTP protocol, but it only accepts the primary key of the table to delete the record. It deletes one record at a time. 


In the later articles we will see, how the relevant Views of each method works and interact with the user. 

So guys today we have created our first controller and examined the code of controller. We learned the different method are available in the controller and their functions. This is fully functional controller. We can modify the details of each method depending upon the requirement of the application. But this bare bone structure is fully operational. 

Stay tuned with us, share, like, subscribe the article and my blog.

Thursday, July 16, 2020

What is CakePHP 4 Development Strategy?

Hi guys, in the last article we have discussed the design pattern of CakePHP 4.0, today we will discuss the development strategy. When we talk about strategy, first question comes in the mind from where we should start. So the answer is in CakePHP we should start from the root. The best practice is to build your database first and then application, in CakePHP 4.0 you will get great advantage with database first approach. We will see below what other features are in CakePHP 4.0 to make our development fast.

If you have not seen the early articles related with CakePHP4.0 visit the main page here.

CakePHP is based on PHP scripting language, means you have a lot of coding power, but the main advantage of CakePHP is, the MVC design pattern and it has ORM (Object Relational Mapping) as a default feature.

CakePHP ORM (Object Relational Mapping)

To make effective use of ORM, the most important thing is to follow the CakePHP conventions. For more detail on conventions check the CakePHP Conventions.

For example if I have to retrieve all the records from my Student Table, I will write the simple code as below.


Use Cake\ORM\TableRegistry

$students = TableRegistry::getTableLocator()->get(‘Students’);

$query = $students->find();

foreach ($query as $row) {           

$row->firstname;

}

Here you have seen that I have not wrote any SQL query, and I have retrieved the data rows form the student table. In fact SQL query is issued but all the job is handled by the ORM behind the scene.  

Bake Console is another amazing plugin available in CakePHP 4.0 

Bake Console

It is a rapid development console based tool. It helps you to build fully functional application within minutes following the previously explained two concepts MVC and ORM. Before you use this tool you have to install it with the help of Composer from the command prompt. You have to type the following command in the root of your application.

Bake Console

Once you have installed CakePHP Bake, navigate to your application BIN folder and type the below command to check the available options with Bake Utility.

Bake Console

Using the Bake utility you can create Model, Controllers, View and many more components just with a single console command. If proper conventions are followed then this auto generated code is not an empty template but it is a fully functional code. Either you have to tweak as little or none.

Today we learned about some more helpful things which will help us to develop the application faster. In the next article we will use the Bake Utility and build a simple running application.

Stay tuned with us and subscribe our blog.